Caramel Apple Shakeology

meal replacement, fall shakeology recipe, shakeology recipe, vanilla shakeology recipe, alternative dessert, healthy dessert

Caramel apple Shakeo

Fall may not have officially started but the leaves are changing, football is in full force and there are pumpkins everywhere! My husband was pushing for an Apple Pie blizzard from Dairy Queen but my lack of self control told me one quick trip through the drive through and the chance of me leaving with only one in hand was slim. So I started thinking of a late night snack that would fill his void for ice cream and keep my goals in tact…and this happened…

Caramel Apple

*8oz of liquid (I used unsweetened almond milk but you could also use water, or a combo of milk and water)

*1 Scoop VANILLA Shakeology

*1/2 of a green apple, sliced

*1 tsp caramel extract

*Lots of ice!!!!

Blend until smooth and enjoy!!!

NOTE: I like to eat mine with a spoon, so I always fill with about 8-10 ounces of ice and “crush ice” on my blender fist then hit the “mix” for about 30 seconds. It comes out thick and smooth – just like ice cream but without all the added stuff!!!!

For all my 21-day fixers* out there: 1 red, 1/2 purple

* The use of milk rather than water would add approximately 40 calories (unsweetened almond milk) and part of a yellow container if following the 21-day fix meal plan. 

Get your first month’s worth of daily, dense nutrition delivered right to your doorstep by clicking HERE.

Not quite sure if you’re ready for a full month – but still want to give it a try? Try the 4-flavor sampler pack! 

Salted Caramel Banana Shakeology

Salted caramel banana shakeology, low calorie shakeology recipe, shakeology recipe, dairy free shakeology recipe, Caramel Shakeology, vanilla shakeology recipe, breakfast alternative

Salted Caramel Banana Shakeology

I love trying out new combos and finding new ways to enjoy my daily dose of Shakeology, and my caramel extract hasn’t failed me yet!!

As I walked down the basement to mix up a little late night snack for my hubby I knew I wanted to use the caramel extract but he tends to prefer the vanilla shakeo over the other flavors. Every other combo I had tried so far used chocolate shakeo and caramel extract. So, I stared at the blender, caramel extract in hand, for about 3 minutes before remembering I had a stock pile of frozen bananas and the wheels started turning. I decided to include a few banana pieces but rather than my usual (heaping) tablespoon of PB2 I went with the cocoa of PB2. A bit of chocolate but not overwhelming. I tossed in a sprinkle of pink himalayan sea salt and BAM – complete!  It was a hit with my hubs and after a small taste I knew I’d be duplicating the next morning 🙂

WHAT YOU NEED:

1 Scoop Vanilla Shakeo

1 TBS Cocoa PB2

1 tsp caramel extract

1/2 a frozen banana

A few shakes of pink himalayan sea salt (optional)

10 oz liquid (I used all water for mine, but 10 oz of almond milk for my husband – totally up to you and your preferences)

Lots of ice!!!

WHAT YOU NEED TO DO:

Add all ingredients to the blender. Crush ice for about 20 seconds and then blend until you reach the consistency you like. I prefer eating mine with a spoon so I blend it pretty thick!

All this goodness coming in just around 200* calories!

For all my fixers* out there: 1 red, 1 purple, 1 tsp

* The use of milk rather than water would add approximately 40 calories (unsweetened almond milk) and part of a yellow container if following the 21-day fix meal plan. 

Get your first month’s worth of daily, dense nutrition delivered right to your doorstep by clicking HERE.

Not quite sure if you’re ready for a full month – but still want to give it a try? Try the 4-flavor sampler pack! 

Chicken and veggie pasta, 21-day fix approved dinner, healthy dinner, dinner in under 30 minutes

Chicken and Veggie Pasta

Chicken and veggie pasta, 21-day fix approved dinner, healthy dinner, dinner in under 30 minutes

I had chicken breasts planned for the grill and a pile of broccoli from the Farmer’s market all chopped and ready to be steamed. Then my daughter requested “noodles” and I saw the box of pasta in the pantry and thought..Hmmmm…maybe I can whip up a pasta dish instead of our classic “grilled chicken with a steamed veggie and side of rice or quinoa”. I didn’t have any pasta sauce, which used to be a pantry staple, but I did have some olive oil, garlic, and lemon….Enter creativity here!

I started by heating  1 TBS of olive oil and 1 TBS of minced garlic in a large pan. In a separate sauce pan, I began boiling water for the pasta.

Next, I cut the chicken into approximately 1″ cubes and browned until thoroughly cooked through – about 8-10 minutes, stirring consistently. Then I added the pasta to the boiling water.

chicken and veggie pasta 1

Next I added the broccoli and juice from two lemons. But when I took a step back I didn’t think I had enough veggies…so I went back to the fridge.

chicken and veggie pasta 2

I found a jar of roasted red peppers and fresh spinach – PERFECT!!!! I sliced the red peppers up (actually my husband sliced the red peppers up) and we mixed everything together and topped with 3 cups of fresh spinach and placed a lid on top to steam.

 chicken and veggie pasta 3

After about 3-5 minutes I removed the lid, gave one last stir and we were complete!!!

chicken and veggie pasta 4


Much better veggie to chicken ratio and dinner was complete in less than 30 minutes and its all 21-day fix approved!!! I consider that a success!!!

chicken and veggie pasta 5


Chicken and Veggie pasta

(makes 6 servings)

21-day fixers: 1 red, 1 green, 1 yellow and 1 tsp (olive oil) 

WHAT YOU NEED:

  • 1.5 – 2 pounds chicken, cut into 1″ cubes

  • 2 cups chopped broccoli

  • 1 cup roasted red peppers, sliced

  • 3 cups fresh spinach (or approximately one cup frozen spinach)

  • 12 oz whole wheat or brown rice pasta cooked according to package directions.

  • 1 TBS olive oil

  • 1 TBS minced garlic or 3 garlic cloves, chopped

  • 2 lemons

  • Parmasean cheese (optional)

WHAT YOU NEED TO DO:

  1. Heat  olive oil and garlic in a large pan.

  2. In a separate sauce pan, bring 6 cups of water to boil and add pasta when water begins to boil, cooked according to directions.

  3. Brown chicken until cooked through, about 8-10 minutes.

  4. Add lemon juice, broccoli and cook for 2-3 minutes

  5. Add roasted red peppers and spinach, cover with lid to steam for 3-5 minutes.

  6. Serve over pasta and enjoy

Its clean, its fast, and it was DELICIOUS!!!!


Whether you’re new to clean eating or a seasoned pro – if you’re interested in more information about ways to enjoy clean eating and/or if you are interested in the 21-day fix workout program,  fill out the form below to join  my upcoming health and fitness accountability and support group! Together we can end the trend of obesity!


How to make your produce last longer

meal plan, how to make your produce last, produce prep,

Do you ever struggle to keep produce fresh, meals adequately planned, while managing to find that exact amount that leaves you balanced for each meal without wasting at the end of the week??? Oh meal planning – its such an art!!!


It seems like we are always running out of fruits and veggies and when I do stock up I end up throwing something out by the time garbage day rolls around regardless of how much I plan – and if there’s one thing that bothers me most its wasting food! Its like practically throwing money down the drain. So in an effort to avoid multiple trips to the grocery store and maximize my time and money spent in a week I started doing this one little trick to make my produce last a little longer: soak EVERYTHING in vinegar-lemon water!!!


Did you know that soaking your produce in a mixture of lemon juice and vinegar will help keep your produce fresh longer and cleans them all at the same time??? I started doing this a few weeks ago and it really helps! I try to get to the farmers market on Saturday morning and I come home, fill my sink with 2 cups vinegar and squeeze two lemons into the water and toss in the rinds then add all my produce! The only thing I did separately this week were the blueberries…too much other stuff in there! So they were done in a separate batch. Just soak everything for about an hour, let everything air dry, then package up into containers and/or freeze! I was able to get this done while doing other things around the house and now everything is ready to be consumed later in the week! 

A few other tips I’ve learned:

1) Certain fruits and veggies spoil faster than others…so that being said: Berries, Bananas, Kiwis, Avocados, Spinach/Lettuce and Grapes should be consumed first….Followed by Tomatoes, Mangoes, Peaches, Melons and Zucchini…then Cucumbers, Pineapples and Pomegrante, and save your Carrots, Oranges, Potatoes, Celery and Apples for last. So as you meal plan keep this in mind!!!

what order to eat produce, how to keep your produce lasting longer, make less trips to the grocery store, grocery shopping tips

2) In addition to eating your ripest produce items first – buy some that are ready to eat and some that need to sit a while. For example, I bought two sets of peaches on Saturday – 4 of them were ready to eat and my husband and I ate them Sunday and Monday and 4 more are sitting out and should be ready by Wednesday so we can have them later in the week. Same thing goes for bananas, avocados and pears!


3) Don’t be afraid to FREEZE!!! I know berry season is almost over so I doubled up on my blueberries and strawberries for several weeks and whatever didn’t get consumed by around day 3 after I bought them got tossed into a freezer bag. I’ll use these in my Shakeology, I’ll add them to yogurt and I’ll add them to my oatmeal. I don’t like to eat frozen berries alone but mixed in with something else and they’re great!!! Same thing goes for Bananas. If I ever see bananas on sale I’ll snag a whole bunch then I let them ripen and then cut into quarters, lay flat in a ziplock bag, freeze and then they’re ready for my morning Shakeology smoothie!!! Just make sure you peel them first…I’ve told several people to freeze their ripen bananas and they toss the whole thing in the freezer and let me tell you that peel doesn’t come off too easy!!!

how to freeze bananas, frozen bananas, bananas for Shakeology

If you find these tips helpful and would like to get 1:1 coaching and support along with motivation and accountability as you begin and/or continue your health and fitness journey, please fill out my challenge and accountability group application below! I share tips and recipes and I will help you with the one thing I always found so difficult – MEAL PLANNING!  Remember – your health and fitness success is 80% nutrition. You can get all the results and support you need right in your own home – and you don’t have to do it alone! 


what is the 21-day fix, 21 day fix promotion, how does the 21-day fix work

21-day fix September Promotion

21 day fix challenge pack promotion, 21 day fix sale, beachbody sale, september promotion

21-day fix – Challenge pack promotion

As one month comes to a close and another one kicks off I am always anxiously awaiting the Beachbody Challenge pack monthly promos. These are a great way to add in a killer workout program at a steap discount when buying your monthly bag of Shakeology…and what better way to kick off the month of September and back to school season than with THE 21-DAY FIX!!!

This program has been the hottest seller since its release in February and it continues to be today. The perfect combination of healthy balanced portion controlled meals and daily exercise which hits your total body head to toe. And what better way to wrap up the combo pack than with a month supply of your daily dose of dense nutrition – SHAKEOLOGY!

You can read a bit more about the program HERE as well as my own success with this incredible program.

what is the 21-day fix, 21 day fix promotion, how does the 21-day fix work

If you’re ready to join me, we can do the 21-day fix TOGETHER – my next support group kicks off September 15th

Its time to get BACK TO SCHOOL & BACK TO YOU

If you are interested in this or any other workout program and would like to get 1:1 coaching and support along with motivation and accountability, please fill out my challenge and accountability application below! I will share tips and recipes and I will help you with the one thing I always found so difficult – MEAL PLANNING!  Remember – your health and fitness success is 80% nutrition. You can get all the results and support you need right in your own home – and you don’t have to do it alone! 

Turkey spinach meatloaf, clean eating, gluten and dairy free meatloaf, 21-day fix

Clean Turkey Meatloaf

Turkey spinach meatloaf, clean eating, gluten and dairy free meatloaf, 21-day fix

So fresh and so clean clean ❤

I’ve been trying to add some new dinners to our weekly rotation. My husband never complains but one can only eat so much grilled chicken and turkey burgers!

When I sat down to do my meal plan for the week meatloaf quickly came to mind! Meatloaf has always been one of those meals my mom would make as I was growing up, when I was home for a weekend in college or still today visiting with my family. I’ve never been able to make it quite like her but I always try!!! I took bits and pieces from things I remember her doing and this time around tweaked it to make it clean, gluten and dairy free and still taste good – sound impossible?!?! Not at all!

Best part – I had this thrown together before my oven was even preheated to 350 degrees!!!

WHAT YOU NEED:

  • 2.5 pounds lean ground turkey
  • 4 Egg whites
  • 1.5-2 cups fresh salsa (I found mine at SAMs club, but most grocery stores have a fresh salsa – just check the ingredients! Mine was primarily  tomatoes, peppers, jalopenos, onion and garlic therefore I didn’t feel like I needed to add any additional ingredients/seasonings.)
  • 4 Cups fresh spinach, chopped

WHAT YOU NEED TO DO:

(note this can be cooked in the slow cooker or oven – see below) 

OVEN OPTION: 

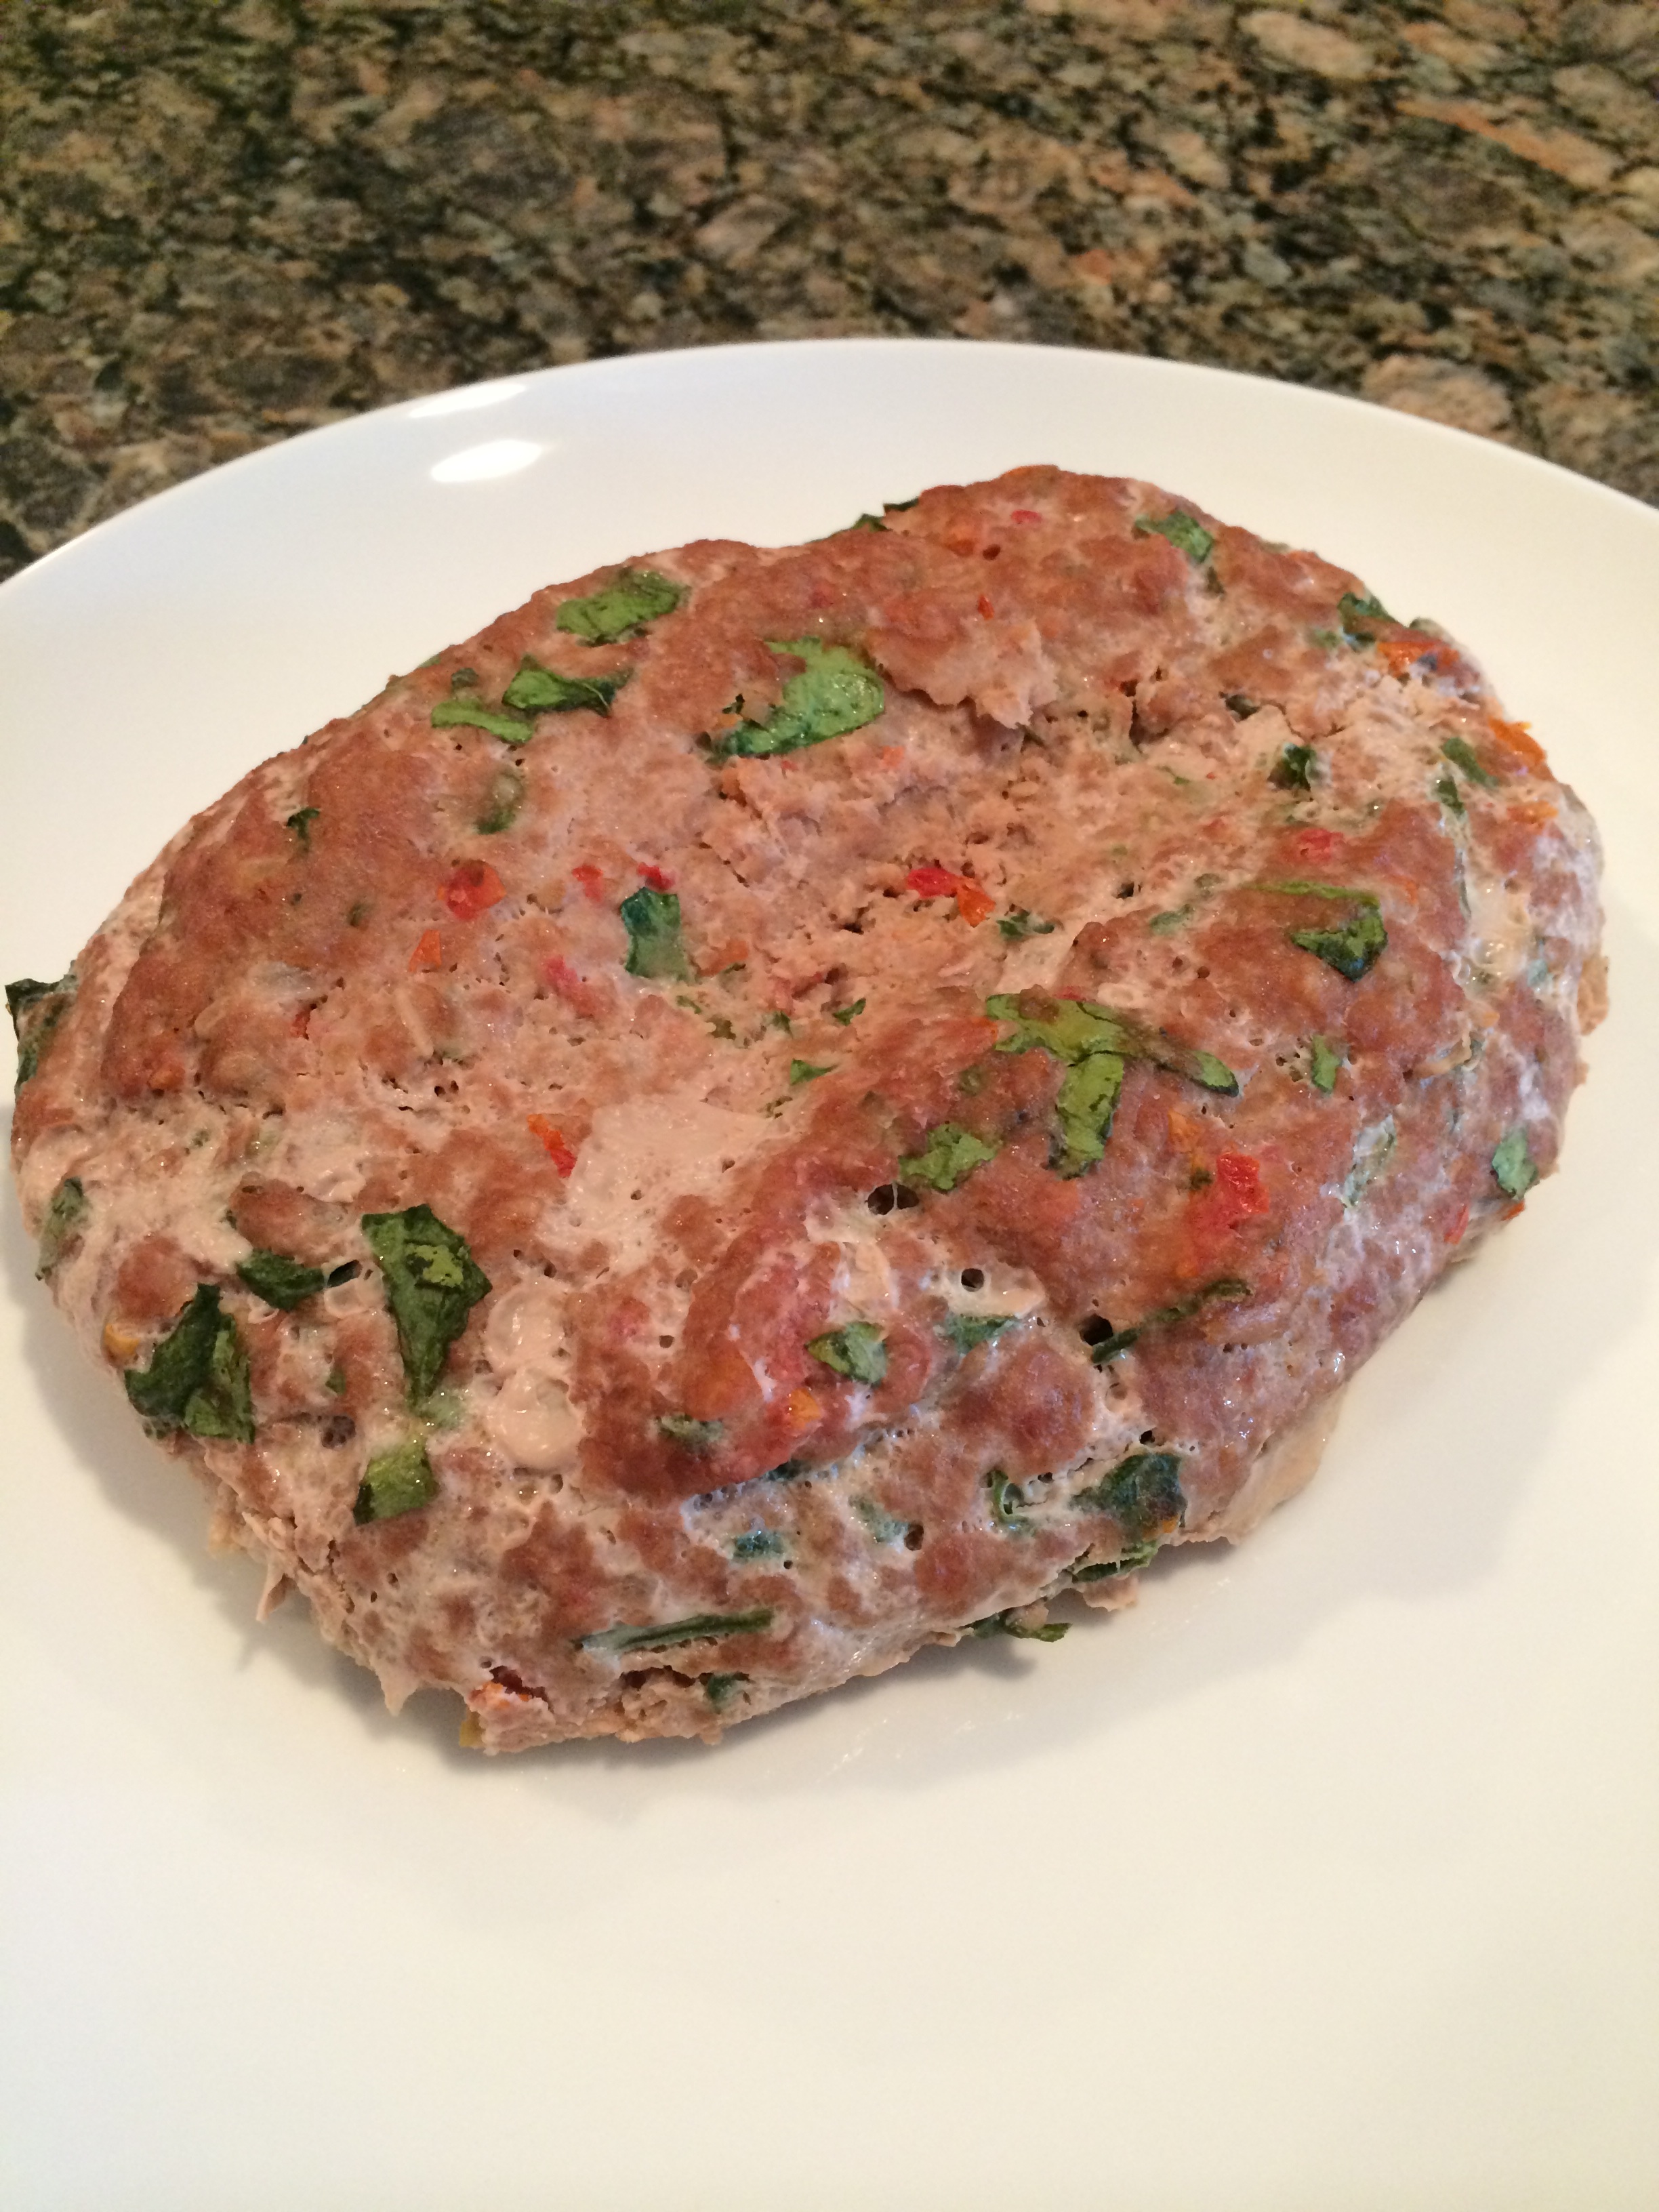
Combine all ingredients in a bowl and mix well. I started with all the meat and egg whites and kept adding the salsa and mixing until I got a consistency that looked like it would hold together. Then I folded in the chopped spinach. You can put in as much or as little as you like. I found its a great way to add in a few more veggies and it certainly looks prettier – and who doesn’t like their food to look as good as it tastes?!?! 🙂

Moving on…

I split the mixture into two loaves and put them on a double layer pan that allows any grease to drip down. I actually never use a meatloaf pan!! Plus, when I cook I almost always make enough for at least two meals. And with my grandparents visiting tomorrow I found this as the perfect opportunity to get dinner made ahead of time and be able to visit with them when they are here!

I put a small dent in the middle to make sure the center got cooked thoroughly, and baked for 30 minutes to brown the outside.

Turkey spinach meatloaf, clean eating, gluten and dairy free meatloaf, 21-day fix

Ready for the oven!

I removed the meatloaf from the oven, covered with foil, and cooked another 30 minutes, checking to make sure they were cooked through.

Turkey spinach meatloaf, clean eating, gluten and dairy free meatloaf, 21-day fix

One for dinner tonight – the other one for tomorrow!

I chose to serve mine with steamed kale tossed in lemon juice and a little sea salt. My hubs had his as a sandwich! Tomorrow I am planning a quinoa salad and asparagus with the leftovers.

For the 21-day fixers out there…I would just count this as one red, even though there is some greens and some purple with the salsa…your portion size will depend on how you slice it but using the container will ensure you don’t over or under do it! 

CROCKPOT OPTION:

For those days when you need to put dinner in, go to work or go run errands and have it all ready when you come home:

-Simply follow the mixing instructions above.

-Lightly spray the crockpot with olive oil and place the meat inside, leaving a 1/2 – 1″ space around the ends so the meatloaf isn’t touching the sides.

-Cook on LOW for 8-10 hours – and wahhhallaaa! Serve with your favorite veggie and some sweet potatoes for a complete meal!

Whether you’re new to clean eating or a seasoned pro – if you’re interested in more information fill out the form below to join one of my upcoming health and fitness accountability and support groups! Together we can end the trend of obesity!


PB Oatmeal Cookie Shakeology, Shakeology Recipes, Clean eating, meal replacement, 21-day fix

Chocolate PB Oatmeal Cookie Shakeology

PB Oatmeal Cookie

I’ve been on an “oatmeal cookie” shakeology kick and this one just may top them all! Perhaps because I am an avid chocolate/PB lover ❤

WHAT YOU NEED:

  • 1 scoop chocolate SHAKEOLOGY
  • 1/4 cup oats
  • 2 TBS PB2
  • 1 tsp vanilla
  • 1/2 cup almond milk
  • 6oz water
  • Ice

WHAT YOU NEED TO DO:

ADD ALL INGREDIENTS TOGETHER – CRUSH ICE – BLEND – ENJOY!!!

PB Oatmeal Cookie Shakeology, Shakeology Recipes, Clean eating, meal replacement, 21-day fix

Tastes like a cheat meal – but its not!

Want to give Shakeology a try? Try this flavor sampler pack to figure what which is your favorite! I like them all…but definitely prefer the chocolate!!!

21 day fix breakfast, peach oatmeal, clean peaches and cream oatmeal, crunchy peaches and cream oatmeal, 21-day fix meal plan

Peaches-n-cream crunchy oatmeal

Did you know Chambersburg is known for its peaches?!? Well, I for one I had NO IDEA! However my amazing Coach, Deidra, just so happens live in Chambersburg and just so happens to be from the town I currently live in. Lucky for me she was visiting her family this weekend and brought home a bunch of peaches and shared with me!!! We got a little visit in and I got some fresh peaches – win win!!!

I’ve ate fresh peaches before, liked them, made them into baby food when my youngest was just starting out on fruits but to be honest I grew up on the canned stuff. The fuzz on an actual peach kind of scared me and I never quite knew how to cut around that pit?! Every time I tried I butchered the peach! Turns out…I just don’t think I ever had the right/ripe peach! This was easy peezy – slice all the way around and pull apart! DONE!

These peaches Deidra gave me are AHMAZING! They’re so juicy and have the perfect sweetness.

So now, what to do with my peach???

clean peaches and cream oatmeal, peach oatmeal, healthy breakfast, clean oatmeal, coach, fitmom, fitfam

What to do with my peaches?

I typically start my day the same exact way everyday. Wake up, drink my E&E, do my workout, have my Shakeology and get started with my day…but I’ve decided to switch things up – insert – Peaches-n-cream crunchy oatmeal for breakfast! And no, not the artificial prepackaged stuff either!

WHAT YOU NEED:

(I’ve added the coordinating 21-day fix containers for quick reference)

  • 1/2 Cup of rolled quick oats (or your favorite oats) – 1 YELLOW
  • 1/2 a Peach, diced – 1/2 PURPLE
  • 4 Halved Walnuts – 1/2 Blue

Optional:

  • 1/4 – 1/2 Scoop Vanialla Protein Powder – This would count towards your reds…One serving of Whey Protein powder is considered to be 1.5 scoops – so depending on how much you put in would determine how to count it for your containers. I used about 1/4 and it was plenty!
  • tsp Honey

WHAT YOU NEED TO DO:

  1. Cook the oats according to package directions (I combined 1/2 cup oats with enough water to cover the oats completely and microwaved for 1 minute)
  2. Add your protein powder and/or honey, walnut pieces and diced peach – mix and enjoy!

21 day fix breakfast, peach oatmeal, clean peaches and cream oatmeal, crunchy peaches and cream oatmeal, 21-day fix meal plan

Perhaps the best part was – my toddler loved it! I left the walnuts out and didn’t use any sweetener but rather cooked his oats in almond milk and topped with the peaches…after the fact I thought cinnamon would have been a great add too – perhaps tomorrow!

Here’s to hoping you and your little ones enjoy!

toddler breakfast, peach oatmeal, clean oatmeal, 21-day fix

Fresh, clean and toddler approved Oatmeal

Chocolate Cinnamon oatmeal cookie shakeology, dessert alternative, healthy breakfast

Chocolate Cinnamon Oatmeal Shakeology

Chocolate Cinnamon oatmeal cookie shakeology, dessert alternative, healthy breakfast

I am such a sucker for oatmeal cookies – and these shakeo totally does the trick!!!

Meet: Chocolate Cinnamon Oatmeal Cookie Shakeology

  • 4 oz almond milk

  • 6 oz water

  • One scoop chocolate Shakeology

  • 1 tsp cinnamon

  • 1 tsp vanilla

  • 1/4 cup oatmeal

  • Ice to your liking – and BLEND!

NOTE: My hubs prefers the vanilla shakeology over the chocolate so I tweaked this to make it appeal to a vanilla fan:

Meet: Vanilla Almond Oatmeal Cookie Shakeology

  • 4 oz almond milk

  • 6 oz water

  • One scoop chocolate Vanilla shakeology

  • 1 TBS All natural Almond Butter

  • 1 tsp vanilla

  • 1/4 cup oatmeal

  • Ice to your liking – and BLEND!

Want to give Shakeology a try? Try this flavor sampler pack to figure what which is your favorite!

PIYO before and after, PIYO results, PIYO flexibility

PIYO Program in Review

PIYO logo

Ok, ok, so if you’ve been following me since week 1 you may be thinking thank goodness this girl is finished with these recaps!!! But hopefully not, hopefully you’ve enjoyed reading through my experience with the new PIYO program and if you think you’re up for the PIYO challenge, I want you give it a try!

I can’t say enough good things about this program. I enjoyed the switch in my regular exercise routine, my knees appreciated the break from all the jumping around that I typically do, and I noticed a significant improvement in my flexibility and coordination.

PIYO before and after, PIYO results, PIYO flexibility

Day 1 vs. Day 60 of PIYO

Some of these moves were tricky for me but I found watching my own videos of my workouts really helped me focus in on what I was doing right and wrong and where I really needed to put forth a little more effort to improve. After all, a lot of these moves were totally new!!! It didn’t happen overnight, but week by week I saw myself improving in different areas and I will happily say although my 8 weeks with PIYO are complete, the workouts will remain tossed into my regular routine!!! They’re different, fun and add a little twist to everyday exercise!!!

PIYO flip progress

PIYO Flip – beginning of the program vs. the end of the 8 weeks

Honestly – when I look back I can’t believe how BAD my coordination was in the beginning!! I remember when I did that first “PIYO FLIP”, if you can even call that top picture a PIYO Flip, and I actually thought I nailed it – WRONG!!!!!

PIYO Kick through, PIYO Progress
Learning how to move in the PIYO Kick through!!

The PIYO Kick through was another one…for weeks I had no idea what Chalene was telling me to do! My hand/feet match ups were off…but I still kept going. I pushed myself. I’d pause the DVD, rewind, watch it again just trying to understand what I was to do. And no joke – it pretty much took me up until the end but I think I finally got it 🙂 However I can’t quite say that I ever really nailed the PiYO cross…guess you can’t win them all right?!

Another important thing I learned from this program is how important your alignment is. Holding each pose  correctly makes such a difference! You have to squeeze that booty, squeeze those abs and hold it until you’re shaking and you can’t shake any more!!!

Side plank, PIYO progress

Learning how to improve my alignment – side plank

I’ve heard some people express concern that they didn’t feel like they were getting a “good workout” in with PIYO and all I can say – is trust the program!!! Like so many things in life – you will get out what you put in. So don’t just go through the motions. Focus. Commit yourself to that DVD for 20 minutes or 30 minutes or all 48 minutes of DRENCH, and be present in the moment and hold each pose as cued, squeeze each muscle and squeeze them hard. When Chalene says to squat, get as low as you can and squeeze every muscle as you stand back up. When you lunge – go back as far as you can and focus as you raise and lower back down. And I promise if you do this you’ll be shaking through that elbow plank and feeling that muscle burn and seeing the results soon after!!! 

Now, I didn’t have a crazy physical transformation – but I didn’t expect one. I was at MY goal weight when I started so I wasn’t trying to lose but rather maintain my weight while gaining strength and flexibility. And I’m happy to say I reached my goals!!! My weight dropped .2 pounds and I lost 4 inches, primarily around my hips and waist, with small decreases in my arms. I was able to increase the number of push ups I can do on my toes from 20 before PIYO to 32 at the end and my goal is to continue working on my push ups and reach 50 by the end of the year!!!

Never Give Up.

PIYO beginning to end, PIYO Program results, PIYO complete

PIYO beginning to end

 If you are interested in this program or any other workout program and would like to get 1:1 coaching and support along with motivation and accountability, please fill out my challenge and accountability application below! I will share tips and recipes and I will help you with the one thing I always found so difficult – MEAL PLANNING!  Remember – your health and fitness success is 80% nutrition. You can get all the results and support you need right in your own home – and you don’t have to do it alone!